Back to Blog Home
Automated invoice processing: How to automate your invoices

When I first started my business, I had no idea how to send an invoice. The idea of managing cashflow from incoming and outgoing payments, while trying to fulfill my commitments to clients, was an overwhelming challenge I was not prepared for.
I remember the first time I tried to get paid for my work. I ended up Googling for an invoice template, manually filled it out, and sent it off to my client via email.
But here’s where things got interesting.
As I began to manage multiple clients at the same time, it became increasingly difficult to keep track of which invoices I had sent, and what their respective statuses were. There were even instances when clients, knowing I had completed the work, would fail to ask for an invoice. It was kind of a wake-up call that I needed to take a more mindful approach to this aspect of my business. If I neglected to diligently track unpaid invoices, they'd inevitably slip my mind, leading to delayed payments and subsequent frustration.
I realized that my lack of organization and understanding of billing and invoicing was something that I had no choice but to improve upon. It was my responsibility to ensure clarity with my clients regarding the invoicing process, and it was up to me to create a systematic and efficient way of getting paid on time.
This is when I discovered the concept of invoice processing automation. But in order to automate the invoicing process, I had to find the right tools. As my business scaled, I could no longer rely on manual templates and saving receipts in my documents folder on my computer.
So, in this article, I’m going to show you exactly how I automate my invoicing process for my marketing agency and why it’s so important to get this right if you want to create a business with healthy financials.
What is automated invoice processing?
Automated invoice processing, often shortened to AP automation (referencing Accounts Payable), revolutionizes the way we manage our invoices. It can transform a time-consuming, manual task into a smooth, streamlined workflow.
Invoice automation is all about using software to automate the tedious manual data entry tasks associated with traditional invoicing. By leveraging this modern approach, we can take all the confusion and wasted time out of the process, replacing it with an efficient and effective automated system.
For me, the way I automate my invoices is with Copilot — the operating system on which I run my entire service business. I’ll get more into how exactly I automate the payable process with Copilot in a bit, but before I get into that we need to understand what features we need from an invoice processing automation software — they are not all created equal.
What to look for in automated invoice processing software
Automating your invoice processing involves more than simply finding a way to digitize your accounts payable process. It's about choosing a tool that supercharges your workflow, bringing real-time clarity and effortless integration with your existing accounting software.
Let's dive into the essential features you should prioritize in your hunt for the perfect invoice automation solution:
- Billing Management: This feature lets you manage all your billing activities from a central location, enhancing visibility and control over your financial operations.
- Branded Invoices from Templates: Goo software will let you generate professional, branded invoices using customizable templates. This saves time and ensures brand consistency across your invoicing.
- Create Recurring Subscriptions: If your business model includes regular billing, such as monthly subscriptions, then the automation software should allow you to set up and manage recurring subscriptions with ease.
- Invoice Statuses: An efficient software will keep you updated about the status of each invoice, whether it's been paid, voided, or is overdue. This enhances your cash flow management and helps maintain good relationships with clients.
- Managing Payment Methods: The software should provide an interface for managing various payment methods via Stripe, including credit cards and bank accounts. This increases convenience for your clients and speeds up the payment process.
- Email Notifications and Reminders: It's one thing to send an invoice, but ensuring it gets paid is another matter. An ideal tool should have a feature that sends automatic email notifications to clients when invoices are due and reminders for unpaid invoices. This keeps your clients informed and minimizes the chances of late or forgotten payments.
- Scalability: Last but certainly not least, the tool you use should be scalable to match your business growth. As your operations expand, so will your invoicing needs, and the software should be capable of handling the increased load without compromising performance.
These features create a robust and efficient invoice automation solution. As it happens, Copilot, my preferred platform for invoice processing automation, ticks all these boxes and even goes beyond, making it a standout choice for any business looking to streamline its invoicing.
Now I’ll show you how I automate my invoicing process, step by step.
5 steps to automate your invoice processing
Here are five steps to automating your invoicing process:
- Choose the Right Automation Platform
- Add Clients or Customers Into Your CRM
- Create a Branded Template
- Create a Subscription To Automate Invoices
- Connect Your Bank Details To Get Paid
Okay, let’s dive deeper into each one.
1. Choose the right automation platform

As mentioned earlier, I use Copilot to manage my entire service business. From onboarding new clients, managing client relationships, reporting, and payments, I no longer need to bounce between various tools to keep track of all my client work and payments.
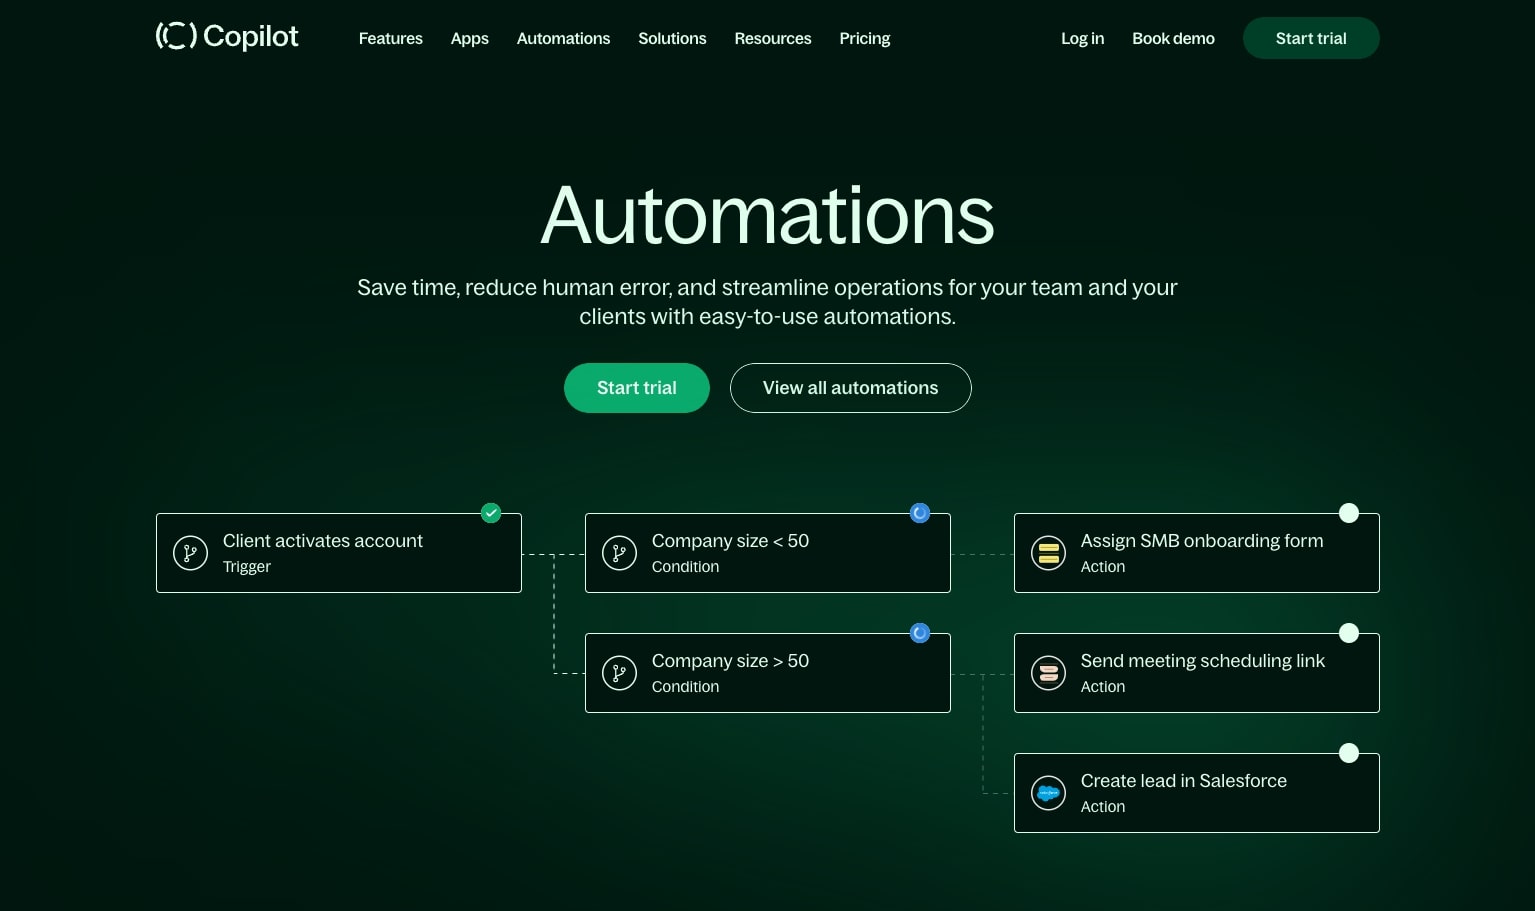
I love using Copilot because they have an automation feature that goes beyond just setting up subscriptions and automatic billing. In fact, Copilot's automated invoice processing makes managing my cashflow a breeze. The software integrates seamlessly with my existing accounting system, QuickBooks, eliminating the need for manual data entry and streamlining my approval process.
But that's not all. I can also automate my client onboarding process, intake forms, and reporting using an integration with Zapier. This means I have a single, comprehensive platform for all my business operations — while still having the ability to expand features using third party integrations if need be.
The ability to automate so many aspects of my business has been a game-changer. I no longer spend countless hours tracking down invoice data or navigating the approval process. Instead, I let Copilot handle the heavy lifting, giving me more time to do what I do best.
If you're looking for a way to streamline your service business and take the pain out of invoicing and client management, I highly recommend giving Copilot a try.
2. Add clients or customers into your CRM
The next step to invoice processing automation is to add your clients into your CRM so you can create invoices, track their status, and send automatic email notifications to clients. In this case, Copilot acts as a CRM and client portal for all of my clients.
With this end-to-end client portal software, it becomes incredibly easy to manage all client interactions and data in one place. Copilot's approval workflows let you track, organize, and even automate the entire process from issuing an invoice to receiving payment.
After setting up your Copilot account, you'll access your internal portal. From here, the first order of business is to enter your client's details into your client manager. You'll find the 'Clients' tab on the sidebar, and from there, you simply click 'New client.' This is where you'll add the necessary information for the client you wish to invoice.
Once you’ve added your client details, it’s time to use Copilot’s built in invoice generator to start sending invoices.
3. Create a branded invoice template
Kickstarting the invoicing process begins with setting up a standardized invoice template. This crucial step not only lends a professional air to your invoices but also saves valuable time. To do this with Copilot, follow these steps:
- Add your client(s). See the previous section for how to do this.
- Head to the Billing section. After adding your client, click on the 'Billing' tab on your dashboard. This is your control center for all invoicing and billing needs, a management system designed to streamline your tasks.
- Begin a new invoice template. A simple click on 'Create an invoice' propels you into setting up your personalized invoice.
At this stage, you can start shaping your invoice template. Your business name, address, and logo will auto-populate from your Copilot account, reducing human error. The client’s business data will draw from their respective profile. You can assign default payment terms, tax rates, and other pertinent details, creating a set of invoice processing workflows that will auto-fill in your invoices.
Establishing an invoice template in Copilot is a one-and-done affair. Once you have your template ready, it's yours to use for all upcoming invoices, lending efficiency to the process and simplifying the task.
4. Create a Subscription To Automate Invoices
Now that you have your invoice template generated, you can automatically generate invoices and send them directly to your clients to be paid. However, we want to create a “set it and forget it” type of workflow where we completely automate our billing process with clients and customers.
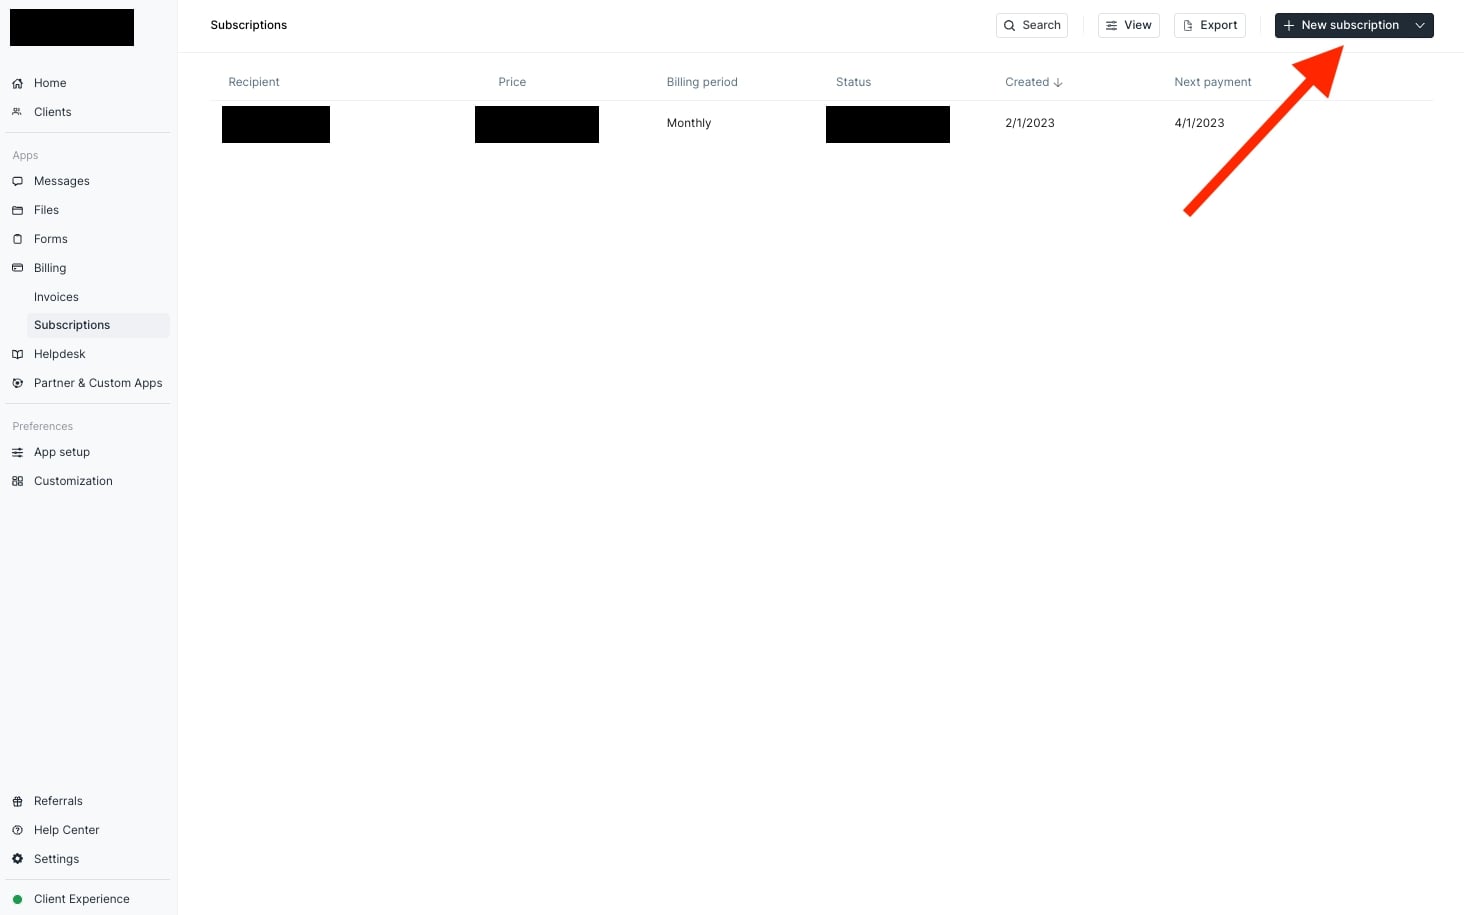
This is where creating subscriptions comes into play. Here we can turn our service business into a subscription business by using Copilot’s subscription feature. To access this, head over to the ‘Billing’ tab and click on ‘Subscriptions’.
Creating a subscription in Copilot is very similar to creating an invoice. Once you click on the ‘Subscriptions’ tab, click on the ‘New subscription’ button in the upper right-hand corner.

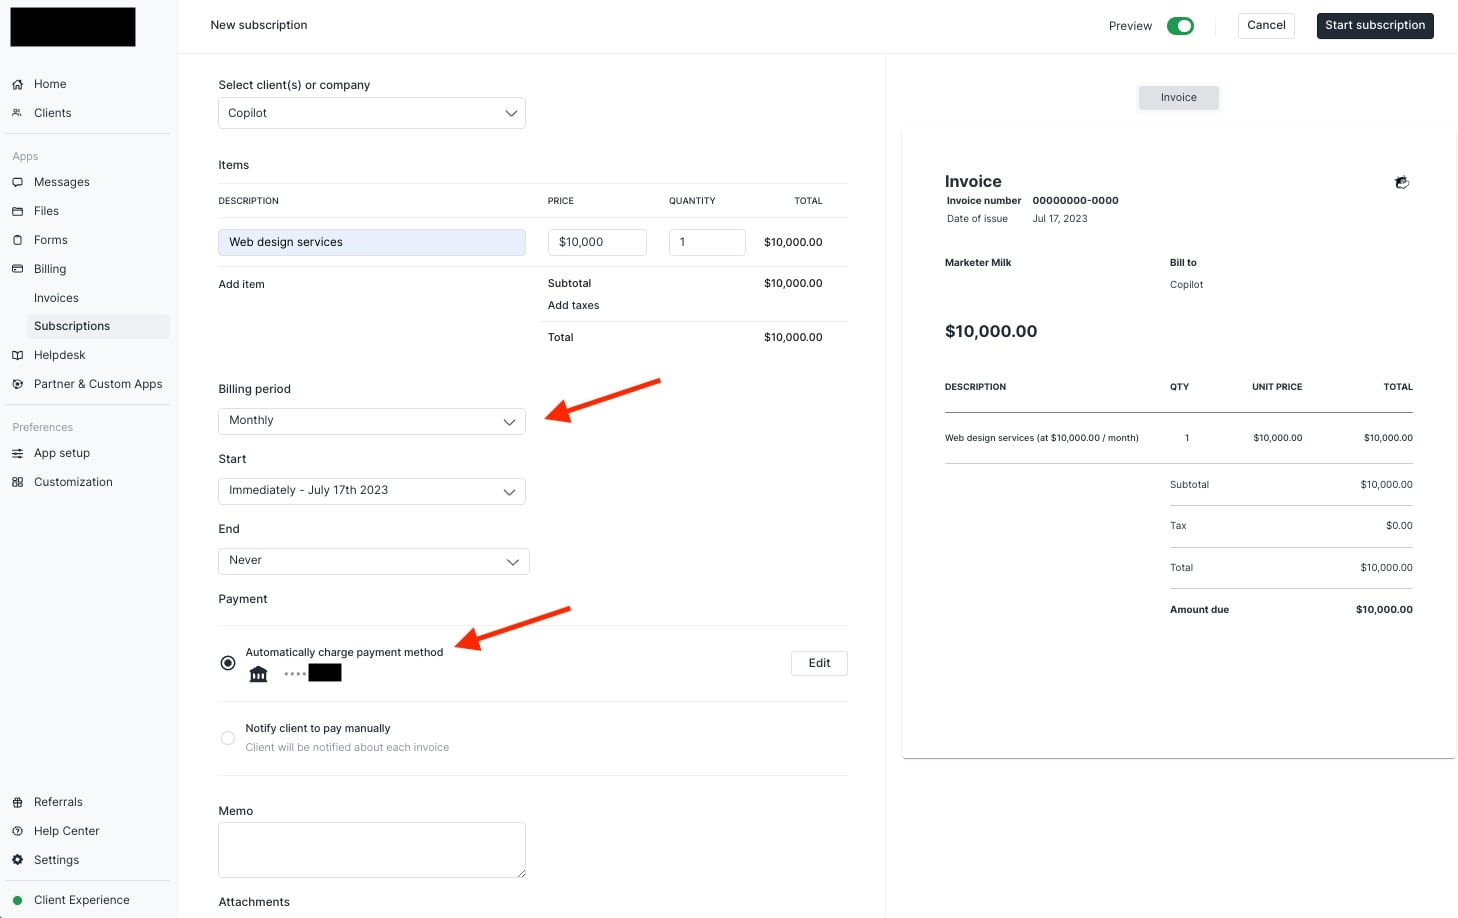
You can then select the client you want to create an automatic subscription for, add line items for your services, and set payment rules.

You can also adjust the billing period to daily, weekly, monthly, quarterly, biannually, or yearly depending on your needs. On top of that, you can also set a start and end date for automatic invoices.
Voilà! You’ve just automated your billing process using Copilot’s invoice automation software. Pretty neat, huh? But one more step, getting the money to your bank account.
5. Connect your bank details to get paid
To make sure you get paid on time, it’s crucial to link your bank account in Copilot. By doing so, you empower your clients to initiate payments automatically as soon as they receive your invoice through the automatic subscription we created in the previous section.
To ensure a seamless invoicing process within Copilot, it's crucial to link your bank account. By doing so, you empower your clients to initiate payments as soon as they receive your invoice via email.
You can easily connect your bank account by navigating to the ‘Settings’ tab located at the lower part of your sidebar. Once there, simply click on ‘Billing’.
Upon reaching the billing page, you have the opportunity to link your preferred bank and modify payment options to suit your clients' needs. Notably, Copilot leverages Stripe's secure system to process payments. While you don't necessarily need a Stripe account to kickstart the process, a bank account is essential for depositing your funds.
It's important to be mindful of the variations in processing times and fees associated with different payment methods. Typically, credit card transactions are faster, taking approximately 2-5 business days. However, they are subject to higher transaction fees. On the contrary, ACH direct bank transfers, while bearing the lowest transaction fees, require a longer processing time of about 5-9 business days.
To simplify payment processes for your clients, it's recommended to offer a broad range of payment options. However, the structure of your payment plans and associated fees depends largely on your preferences. By default, Copilot allocates most of the transaction fees to your client. However, there's an option to "Absorb transaction fees" if you prefer to spare your client from additional costs. While this could slightly reduce your overall income, it could significantly enhance your client's experience.
And just like that, you’ve automated your invoicing process and created a system to get paid on time!
Conclusion
Incorporating invoice processing automation offers a potent solution to many challenges faced by finance teams in modern businesses. The elimination of bottlenecks associated with manual invoice processing highlights the myriad benefits of automated invoice processing. This shift allows for enhanced efficiency in managing electronic invoices and revolutionizes the traditional AP process.
With workflow automation powered by advanced artificial intelligence, accounting teams can operate with unprecedented accuracy and speed. This technology removes the constraints and potential for errors of manual invoice processing, leading to significant improvements in business processes.
The adoption of invoice processing automation thus represents a valuable investment for businesses. It addresses existing challenges, optimizes business processes, and positions finance and accounting teams for success in their roles. Ultimately, the benefits of such a system underscore the importance of innovation in maintaining efficiency and competitiveness in today's fast-paced business environment.
Share this post
Sign up for our newsletter
Subscribe to our newsletter to receive emails about important announcements, product updates, and guides relevant to your industry.
